 New versions vs new files in Google Docs
When you share a file in this way, there are three main issues to consider:
- Where to put the file
- How people will find it
- What format to use.
Today, Google Drive is the most obvious file hosting option for people using Blogger. (A file host is somewhere that you can put files you can access later in any web browser, or share with others).
I thought a lot about the best format to use for these files: if I convert them to Google Drive (AKA Docs) format, they won’t count against my file-storage quota, and everyone has access to Google Drive/Docs. But not everyone has a Google account, or access to Docs at the time when they want to work on the file. And some people might struggle with using Word tables and formatting. So in the end, I decided to stick with MS Word and PDF formatted versions, for now at least. I then share the direct link to the files.
But what happens if I want to change the file, for example to fix a typo that was missed originally, or to add a new feature?
If I just upload a new Word or PDF file to Google Docs then the links to this file will be different – even if it has the same name as a previously uploaded file. People who go directly to the original file file will get the old (wrong) version – or even worse, I’ll delete it and they will have a broken link.
However I’ve found that if I use Google Drive’s tools for loading a new version of the file, then people with the link will always go directly to the latest version – and I can choose whether to keep the older versions inside Drive, or to delete them.
How to load a new version of a file to Google Drive
- Log in to Google Drive, using the Google account that owns the document.
- Navigate to the folder that the file is in.
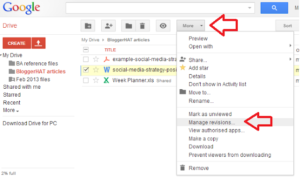
- Tick the document that you want to replace or update
- Select More, from the navigation options bar above the list of documents
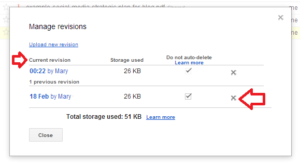
- Go to Manage Revisions
If you want, delete the older non-current one using the “x” checkmark to the right hand side of the screen.
Job done: anyone who goes to the existing file link will now get your most-recently-uploaded version of the document.
Troubleshooting
If there is no “Manage Revisions” option, then most probably the file is in native Google Docs format rather than another like Microsoft Word or PDF. In this case, you need to edit it on-line. Unfortunately I haven’t found a way to temporarily leave the old, unedited, version available to any one who looks at the file before you have finished opening it. This could be particularly annoying if you want to make a lot of changes – in this case, it may be best to convert the file back to a downloadable format (Word, etc) and work on it locally before re-uploading and then copy-and-pasting te new contents back to your original file.
Can this be done with the Drive desktop software?
The short answer is: I don’t know.
I have multiple Google accounts, for different blogs, so I’ve decided that it’s safest to always use the web-browser based tools to manage files in Drive, rather than try to work with different accounts on different areas of my local file store.
If you do know, please leave a comment below.


